-
摘要:
在光学系统中使用非球面可以有效校正像差,改善像质,进而简化系统结构;并且增大系统口径可以从根本上提高系统的分辨本领,因此在基础科学研究、天文学宇宙探测以及国防安全等领域都对大口径非球面镜有着迫切需求。大口径非球面的制造在现代光学制造工程中扮演着重要的角色。本文以大口径非球面镜的先进制造为主题,对大口径非球面镜的光学加工技术,特别是研磨抛光技术及其过程中所采用的面形检测方法进行了综述,特别总结了新一代先进光学制造的技术特征,展望了未来大口径非球面镜的制造策略。
Abstract:The aspheric surface can correct the system aberration and improve the image quality in the optical imaging system, in addition to that it can simplify the system structure significantly; On the other hand, the resolution of imaging system can be increased by improving the system aperture. Therefore, in the domain of basic scientific research, astronomical cosmological exploration and military defense security the large-aperture aspheric mirrors are all highly required. The manufacturing of large-aperture aspheric mirrors plays a critical role in modern optical engineering. This paper focuses on the advanced manufacturing techniques of large-aperture aspheric mirrors. The optical manufacturing technologies, especially the grinding and polishing techniques of large-aperture aspheric mirrors in the past half century and the surface shape testing methods during the grinding and polishing process, are reviewed. In particular, it summarizes the technical characteristics of advanced (new generation) optical manufacturing, and looks forward to the future manufacturing strategy of large-diameter aspheric mirrors.
-
Key words:
- large-aperture aspheric mirror /
- optical manufacturing /
- optical testing
-

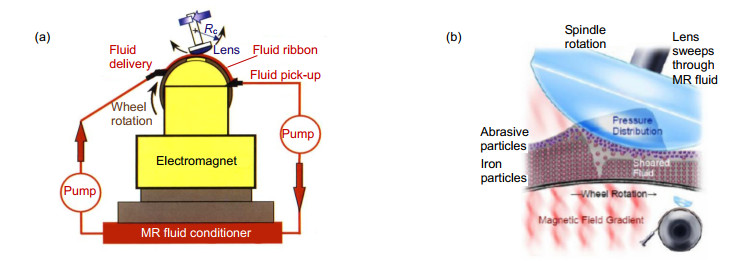
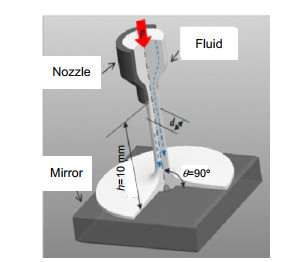
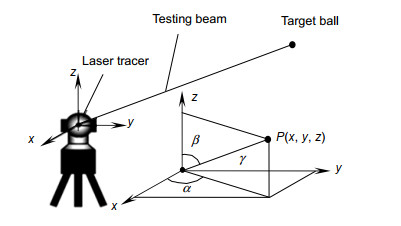
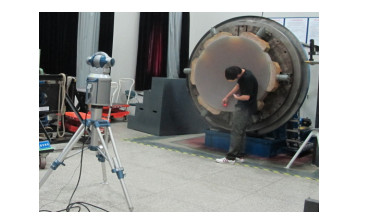
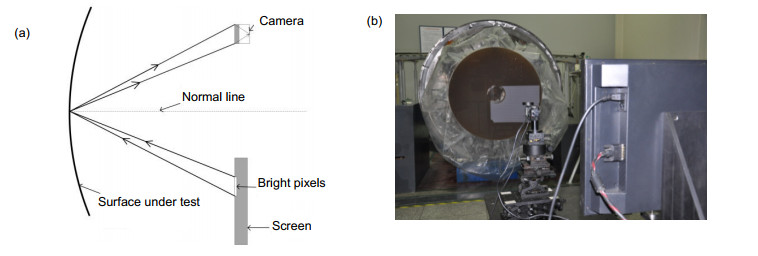
Overview: In optical imaging system, the aspheric surfaces possess outstanding aberration correction capability comparing to traditional spherical surfaces. Using asphere in optic design can simplify the optical system dramatically, which is especially beneficial to many space-based optical systems. Therefore, aspheric optics are playing an increasingly important role in modern optical system. It is known to us the system aperture determines the system's resolution based on Rayleigh criterion, therefore, the system aperture is getting larger and larger to obtain a keener resolution. In this paper we first introduced the rushing needs of large-aperture aspheric mirrors in modern optical engineering, e.g. high-resolution earth observation camera, high-power laser weapon, large ground- or space-based telescope, inertial confinement fusion (ICF), and also modern EUV lithography machine. There's no doubt that the manufacturing of large-aperture aspheric mirror is of great interest in modern optical engineering. Over the past century, lots of manufacturing techniques are developed, and we summarized the optical manufacturing and optical testing techniques of large-aperture aspheric mirror based on our practical optical manufacturing experience in our institute. In optical manufacturing, the grinding and polishing process are of critical importance, therefore we mainly focus on the representative polishing and testing techniques. For optical polishing, we classified the techniques into three generations, the first generation is traditional mechanical polishing which is an indeterministic processing tool; the second generation is computer controlled optical surfacing (CCOS) which is deterministic and already widely used for large-aperture mirror manufacturing in our country; the third generation is called controllable adaptive polishing, e.g. stressed/active lap polishing, bonnet polishing, magnetorheological finishing (MRF) polishing, ion beam figuring (IBF), et al. The controllable adaptive polishing techniques are advanced and are necessary for high accuracy large-aperture aspheric mirrors. Optical testing techniques are also reviewed. They are classified by different principles, e.g. coordinate measurement techniques, geometric light methods and physical optics methods (interferometry). Different methods can serve for different procedures during the grinding and polishing process. Generally speaking, large dynamic range, high accuracy, and also more adaptive testing techniques is the trend of optical testing. But one should bear in mind that the manufacture of large-aperture aspheric mirror is a complex and long process, no testing methods can cover the whole process, typically more than three testing methods are needed to ensure the optical manufacturing. In the third part we summarized the technical characteristics of advanced (new generation) optical manufacturing, and looked forward to the future manufacturing strategy of large-diameter aspheric mirrors.
-

-
-
[1] 潘君骅.光学非球面的设计、加工与检验[M].苏州:苏州大学出版社, 2004.
Pan J H. The Design, Manufacture and Test of the Aspherical Optical Surfaces[M]. Suzhou: Soochow University Press, 2004.
[2] 辛企明.光学塑料非球面制造技术[M].北京:国防工业出版社, 2005.
Xin Q M. Manufacturing Technology of Plastic Aspheric Lens[M]. Beijing: National Defense Industry Press, 2005.
[3] NASA. Webb Space Telescope[EB/OL] https://www.jwst.nasa.gov/content/about/index.html.
[4] Stahl H P. Optics needs for future space telescopes[J]. Proceeding of SPIE, 2003, 5180: 1-5. http://spie.org/Publications/Proceedings/Paper/10.1117/12.514277
[5] 胡建军.非球面研制实录[D].苏州: 苏州大学2009.
Hu J J. Development memoir of aspheric surfaces[D]. Suzhou: Soochow University, 2009.
[6] MDAA. Defense Support Program[EB/OL] https://missiledefenseadvocacy.org/defense-systems/defense-support-program/
[7] 潘君骅.高科技时代的光学需求[J].江苏科技信息, 2005(2): 1-4. http://www.cqvip.com/Main/Detail.aspx?id=15069650
Pan J H. Optical requirements in the high-tech age[J]. Jiangsu Science & Technology Information, 2005(2): 1-4. http://www.cqvip.com/Main/Detail.aspx?id=15069650
[8] TMT International Observatory. TMT Complex[EB/OL] https://www.tmt.org/image/50.
[9] 李圣怡, 戴一帆.大中型光学非球面镜制造与测量新技术[M].北京:国防工业出版社, 2011: 5-34.
Li S Y, Dai Y F. New Technology for Manufacturing and Measurement of Large and Middle-Scale Aspheric Surfaces[M]. Beijing: National Defense Industry Press, 2011: 5-34.
[10] 杨力.现代光学制造工程[M].北京:科学出版社, 2009: 91-99.
Yang L. Modern Optical Manufacturing Engineering[M]. Beijing: Chinese Science Press, 2009: 91-99.
[11] 网易新闻.惯性约束核聚变, 或许是人类利用核能的另一种可能[EB/OL] https://zhuanlan.zhihu.com/p/56773505.
[12] 王淦昌, 袁之尚.惯性约束核聚变[M].合肥:安徽教育出版社, 1996.
Wang G C, Yuan Z S. Inertial Confinement Fusion[M]. Hefei: Anhui Education Press, 1996.
[13] 杨力.先进光学制造技术[M].北京:科学出版社, 2001.
Yang L. Advanced Optical Manufacturing Technology[M]. Beijing: Chinese Science Press, 2001.
[14] 戴一帆, 彭小强.光刻物镜光学零件制造关键技术概述[J].机械工程学报, 2013, 49(17): 10-18. http://www.cqvip.com/QK/90288X/201317/47459188.html
Dai Y F, Peng X Q. Overview of key technologies for optical manufacturing of lithographic projection lens[J]. Journal of Mechanical Engineering, 2013, 49(17): 10-18. http://www.cqvip.com/QK/90288X/201317/47459188.html
[15] ASML. https://www.asml.com/en.
[16] 牛科技.台积电宣布5nm进入量产, 3nm明年正式试产, 英特尔流下了委屈的泪水[EB/OL]. (2020-04-17). http://finance.sina.com.cn/stock/relnews/us/2020-04-17/doc-iirczymi6878241.shtml.
[17] 中国科学院长春光学精密机械与物理研究所. 4米量级高精度SiC非球面反射镜制造系统[J].中国科学院院刊, 2018, 33(S1): 52-55. http://www.bulletin.cas.cn/publish_article/2018/Z1/2018Z114.htm
Changchun Institute of Optics, Fine Mechanics and Physics, CAS. Manufacturing system of 4 m high-precision SiC aspheric mirror[J]. Bulletin of Chinese Academy of Sciences, 2018, 33(S1): 52-55. http://www.bulletin.cas.cn/publish_article/2018/Z1/2018Z114.htm
[18] 苏定强. 2.16米天文望远镜工程文集[M].北京:中国科学技术出版社, 2001.
[19] Rupp V. The development of optical surfaces during the grinding process[J]. Applied Optics, 1965, 4(6): 734-748. http://www.opticsinfobase.org/abstract.cfm?uri=ao-4-6-743
[20] 郑立功.离轴非球面CCOS加工过程关键技术研究[D].长春: 中国科学院长春光学精密机械与物理研究所, 2003.
Zheng L G. Key technology of off-axis aspheric CCOS fabrication[D]. Changchun: Changchun Institute of Optics, Fine Mechanics and Physics, CAS, 2003.
[21] Gallagher B. JWST mirror manufacturing status[R]. Talk for NASA Technology Days, 2006.
[22] 刘海涛.能动磨盘加工大口径非球面关键技术研究[D].成都: 中国科学院光电技术研究所, 2014.
Liu H T. Key technique of computer controlled active lap in fabrication of large aspherics[D]. Chengdu: Institute of Optics and Electronics, Chinese Academy of Sciences, 2014.
[23] Lubliner J, Nelson J E. Stressed mirror polishing. 1: a technique for producing nonaxisymmetric mirrors[J]. Applied Optics, 1980, 19(14): 2332-2340. doi: 10.1364/AO.19.002332
[24] 沈祖耀.光学望远镜的飞跃——Keck望远镜[J].天文学进展, 1985, 3(4): 396-397. http://www.cnki.com.cn/Article/CJFDTotal-TWJZ198504020.htm
Shen Z Y. A leap forward for optical telescopes[J]. Progress in Astronomy, 1985, 3(4): 396-397. http://www.cnki.com.cn/Article/CJFDTotal-TWJZ198504020.htm
[25] Geyl R, Cayrel M. REOSC contribution to VLT and Gemini[J]. Proceedings of SPIE, 1999, 3739: 40-46. doi: 10.1117/12.360150
[26] Martin H M, Anderson D S, Angel J R P, et al. Progress in the stressed-lap polishing of a 1.8-m f/1 mirror[J]. Proceedings of SPIE, 1990, 1236: 682-690. doi: 10.1117/12.19235
[27] Smith B K, Burge J H, Martin H M. Fabrication of large secondary mirrors for astronomical telescopes[J]. Proceedings of SPIE, 1997, 3134: 51-61. http://spie.org/Publications/Proceedings/Paper/10.1117/12.295151
[28] 张伟.基于数控加工大口径非球面主镜的均匀去除方法研究[D].北京: 中国科学院光电技术研究所, 2016.
Zhang W. Research on uniform removal method in fabrication of large aspherical mirror based on NC machining[D]. Beijing: Institute of Optics and Electronics, Chinese Academy of Sciences, 2016.
[29] 崔向群, 高必烈, 汪达兴, 等.一种大口径大非球面度天文镜面磨制新技术[J].光学学报, 2005, 25(3): 402-407. http://d.wanfangdata.com.cn/Periodical/gxxb200503024
Cui X Q, Gao B L, Wang D X, et al. A new polishing technology for large diameter and deep aspherical mirror[J]. Acta Optica Sinica, 2005, 25(3): 402-407. http://d.wanfangdata.com.cn/Periodical/gxxb200503024
[30] 罗霄.采用平转动应力盘技术加工超大口径非球面的研究[D].长春: 中国科学院长春光学精密机械与物理研究所, 2011.
Luo X. Fabrication of large aspherics using stressed lap with orbital tool motion[D]. Changchun: Changchun Institute of Optics, Fine Mechanics and Physics, Chinese Academy of Sciences, 2011.
[31] Walker D D, Beaucamp A T H, Brooks D, et al. Novel CNC polishing process for control of form and texture on aspheric surfaces[J]. Proceedings of SPIE, 2002, 4767: 99-105. doi: 10.1117/12.451322
[32] 宋剑锋.曲面光学零件气囊抛光工艺参数优化及其相关技术研究[D].哈尔滨: 哈尔滨工业大学, 2009.
Song J F. Research on the optimization of the process parameters and its correlative technology in bonnet polishing the curved optical parts[D]. Harbin: Harbin Institute of Technology, 2009.
[33] Yu G Y, Walker D, Li H Y. Implementing a grolishing process in Zeeko IRP machines[J]. Applied Optics, 2012, 51(27): 6637-6640. doi: 10.1364/AO.51.006637
[34] Harris D C. History of magnetorheological finishing[J]. Proceedings of SPIE, 2011, 8016: 80160N. doi: 10.1117/12.882557
[35] 李龙响.大口径非球面磁流变加工的关键技术研究[D].长春: 中国科学院长春光学精密机械与物理研究所, 2016.
Li L X. Study on the key techniques of magnetorheological finishing for large aspheric optics[D]. Changchun: Changchun Institute of Optics, Fine Mechanics and Physics, Chinese Academy of Sciences, 2016.
[36] Fähnle O W, Van Brug H, Frankena H J. Fluid jet polishing of optical surfaces[J]. Applied Optics, 1998, 37(28): 6771-6773. doi: 10.1364/AO.37.006771
[37] Allen L N. Progress in ion figuring large optics[J]. Proceedings of SPIE, 1994, 2428: 237-247. http://proceedings.spiedigitallibrary.org/proceeding.aspx?articleid=993166
[38] 刘振宇.大口径非球面反射镜组合加工技术驻留时间算法研究[D].长春: 中国科学院长春光学精密机械与物理研究所, 2013.
Liu Z Y. Dwell time algorithm of multi-mode technique for fabrication of large aspherics[D]. Changchun: Changchun Institute of Optics, Fine Mechanics and Physics, Chinese Academy of Sciences, 2013.
[39] 曾雪锋.光学表面频段误差对成像质量的影响研究[D].长春: 中国科学院长春光学精密机械与物理研究所, 2014.
Zeng X F. Impact on image performance of surface spatial frequency[D]. Changchun: Changchun Institute of Optics, Fine Mechanics and Physics, Chinese Academy of Science, 2014.
[40] Malacara D. Optical Shop Testing[M]. 3rd ed. Hoboken, N J: Wiley, 2007.
[41] www.taylor-hobson.com.cn/products/non-contact-3d-optical-profilers/luphos/luphoscan.
[42] https://www.tno.nl/en/focus-areas/industry/roadmaps/semiconductor-equipment/photonics/nanomefos/.
[43] Anderson D S, Burge J H. Swing-arm profilometry of aspherics[J]. Proceedings of SPIE, 1995, 2536: 169-179. doi: 10.1117/12.218421
[44] 朱日宏, 孙越, 沈华.光学自由曲面面形检测方法进展与展望[J].光学学报, 2021, 41(1): 0112001.
Zhu R H, Sun Y, Shen H. Progress and prospect of optical freeform surface measurement[J]. Acta Optica Sinica, 2021, 41(1): 0112001.
[45] Su P, Oh C J, Parks R E, et al. Swing arm optical CMM for aspherics[J]. Proceedings of SPIE, 2009, 7426: 74260J. http://spie.org/Publications/Proceedings/Paper/10.1117/12.828493
[46] 刘力.基于激光跟踪仪的大口径非球面镜在位检测技术研究[D].长春: 中国科学院长春光学精密机械与物理研究所, 2016.
Liu L. Research on the application of laser tracker in measurement of large aspheric mirror[D]. Changchun: Changchun Institute of Optics and Fine Mechanics and Physics, Chinese Academy of Science, 2016.
[47] Burge J H, Su P, Zhao C Y, et al. Use of a commercial laser tracker for optical alignment[J]. Proceedings of SPIE, 2007, 6676: 66760E. doi: 10.1117/12.736705
[48] Foucault L M. Description des procedes employes pour reconnaitre la configuration des surfaces optiques[J]. Comptes Rendus de l'Academie des Sciences, 1858, 47: 958-959.
[49] 马拉卡拉(墨).光学车间检测[M].杨力, 译.北京: 机械工业出版社, 2012.
[50] 王小鹏, 朱日宏, 王雷, 等.数字刀口仪定量检验非球面光学元件面形[J].光学学报, 2011, 38(1): 0112008. http://www.wanfangdata.com.cn/details/detail.do?_type=perio&id=gxxb201101023
Wang X P, Zhu R H, Wang L, et al. Digitized foucault tester for quantitative evaluation the surface of aspheric optical elements[J]. Acta Optica Sinica, 2011, 38(1): 0112008. http://www.wanfangdata.com.cn/details/detail.do?_type=perio&id=gxxb201101023
[51] Platt B C, Shack R. History and principles of Shack-Hartmann wavefront sensing[J]. Journal of Refractive Surgery, 2001, 17(5): 573-577. doi: 10.3928/1081-597X-20010901-13
[52] 饶学军, 凌宁, 王成, 等.哈特曼-夏克传感器在非球面加工中的应用[J].光学学报, 2002, 22(4): 491-494. http://d.wanfangdata.com.cn/Periodical/gxxb200204024
Rao X J, Ling N, Wang C, et al. Application of Hartmann-shack sensor in aspheric process[J]. Acta Optica Sinica, 2002, 22(4): 491-494. http://d.wanfangdata.com.cn/Periodical/gxxb200204024
[53] Yang H S, Lee Y W, Lee J H, et al. Implementation of Hartmann test for measuring 0.9-m aspheric mirror[J]. Proceedings of SPIE, 2005, 5638: 154-163. doi: 10.1117/12.575568
[54] Yang H S, Lee Y W, Song J B. Null Hartmann test for the fabrication of large aspheric surfaces[J]. Optics Express, 2005, 13(6): 1839-1847. doi: 10.1364/OPEX.13.001839
[55] 张雨东, 姜文汉, 史国华, 等.自适应光学的眼科学应用[J].中国科学G辑:物理学力学天文学, 2007, 37(S1): 68-74. http://kns.cnki.net/KCMS/detail/detail.aspx?dbcode=CJFD&filename=JGXK2007S1007
Zhang Y D, Jiang W H, Shi G H, et al. Ophthalmology applications of adaptive optics[J]. Science in China Series G-Physics, Mechanics & Astronomy, 2007, 37(S1): 68-74. http://kns.cnki.net/KCMS/detail/detail.aspx?dbcode=CJFD&filename=JGXK2007S1007
[56] 朱彬, 许冰, 胡渝. Hartmann-Shack传感器在光束质量测量中的应用[J].激光杂志, 2001, 22(2): 34-35. http://www.cqvip.com/QK/91041X/20012/5191966.html
Zhu B, Xu B, Hu Y. The application of hartmann-Shack sensor in measurement of beam quality[J]. Laser Journal, 2001, 22(2): 34-35. http://www.cqvip.com/QK/91041X/20012/5191966.html
[57] 张金平.夏克-哈特曼波前传感器检测大口径非球面应用研究[D].长春: 中国科学院长春光学精密机械与物理研究所, 2012.
Zhang J P. Research on testing aspherical surface using Shack- Hartmann wavefront sensor[D]. Changchun: Changchun Institute of Optics, Fine Mechanics and Physics, Chinese Academy of Sciences, 2012.
[58] 袁婷.基于条纹反射法的大口径非球面反射镜面形检测技术研究[D].长春: 中国科学院长春光学精密机械与物理研究所, 2016.
Yuan T. Study on fringe-reflection optical surface shape measurement technology for large aspheric mirror[D]. Changchun: Changchun Institute of Optics, Fine Mechanics and Physics, Chinese Academy of Sciences, 2016.
[59] Su P, Wang S S, Khreishi M, et al. SCOTS: a reverse Hartmann test with high dynamic range for Giant Magellan Telescope primary mirror segments[J]. Proceedings of SPIE, 2012, 8450: 84500W. doi: 10.1117/12.926719
[60] [61] [62] Kim C J, Wyant J C. Subaperture test of a large flat or a fast aspheric surface[J]. Journal of the Optical Society of America, 1981, 71: 1587. http://adsabs.harvard.edu/abs/1981OSAJ...71.1587K
[63] Murphy P, Fleig J, Forbes G. Subaperture stitching interferometry for testing mild aspheres[J]. Proceedings of SPIE, 2006, 6293: 62930J. http://spie.org/x648.html?product_id=680473
[64] 师途, 杨甬英, 张磊, 等.非球面光学元件的面形检测技术[J].中国光学, 2014, 7(1): 26-46. http://www.cnki.com.cn/Article/CJFDTotal-ZGGA201401002.htm
Shi T, Yang Y Y, Zhang L, et al. Surface testing methods of aspheric optical elements[J]. Chinese Optics, 2014, 7(1): 26-46. http://www.cnki.com.cn/Article/CJFDTotal-ZGGA201401002.htm
[65] Garbusi E, Pruss C, Osten W. Interferometer for precise and flexible asphere testing[J]. Optics Letters, 2008, 33(24): 2973-2975. doi: 10.1364/OL.33.002973
[66] Garbusi E, Osten W. Perturbation methods in Optics: application to the interferometric measurement of surfaces[J]. Journal of the Optical Society of America A, 2009, 26(12): 2538-2549. doi: 10.1364/JOSAA.26.002538
[67] [68] 沈华.基于多重倾斜波面的光学自由曲面非零位干涉测量关键技术研究[D].南京: 南京理工大学, 2014.
Shen H. Research on key techniques of tilted-wave-interferometer used in the measurement of freeform surfaces[D]. Nanjing: Nanjing University of Science and Technology, 2014.
[69] Wu Y Q, Zhang Y D, Wu F, et al. Far-infrared Fizeau interferometer for large aspheric mirror[J]. Proceedings of SPIE, 2008, 7064: 70640S. doi: 10.1117/12.794415
[70] Wu Y Q, Zhang Y Z, Wu F. Design of far-infrared interferometer at 10.6μm[C]//Proceedings of 2009 Symposium on Photonics and Optoelectronics, 2009: 1-4.
[71] Huang L B, Lu X X, Zhou Y F, et al. Dual-wavelength interferometry based on the spatial carrier-frequency phase-shifting method[J]. Applied Optics, 2016, 55(9): 2363-2369. doi: 10.1364/AO.55.002363
[72] Wu T, Valera J D, Moore A J. High-speed, sub-Nyquist interferometry[J]. Optics Express, 2011, 19(11): 10111-10123. doi: 10.1364/OE.19.010111
[73] Szwaykowski P, Olszak A. Nulling Fizeau Interferometer for Aspheric Surface Measurements[C]//Proceedings of Optical Fabrication and Testing 2010, 2010.
[74] 闫锋涛.大口径凸非球面镜拼接测试技术研究[D].北京: 中国科学院大学, 2014.
Yan F T. The measurement of large convex ashpheric mirrors with subaperture stitching method[D]. Beijing: University of Chinese Academy of Sciences, 2014.
[75] Dall H E. A null test for paraboloids[J]. J Br Astron Assoc, 1947, 57: 201.
[76] Offner A. A null corrector for paraboloidal mirrors[J]. Applied Optics, 1963, 2(2): 153-155. doi: 10.1364/AO.2.000153
[77] Zhang Y D, Wu Y Q, Fan B. Theoretical and experimental study of a catadioptric compensator for an aspheric surface[J]. Applied Optics, 2013, 52(27): 6834-6839. doi: 10.1364/AO.52.006834
[78] Wyant J C, Bennett V B. Using computer generated holograms to test aspheric wavefronts[J]. Applied Optics, 1972, 11(5): 2833-2839. http://www.ncbi.nlm.nih.gov/pubmed/20119414
[79] Xue S, Chen S Y, Fan Z B, et al. Adaptive wavefront interferometry for unknown free-form surfaces[J]. Optics Express, 2018, 26(17): 21910-21928. doi: 10.1364/OE.26.021910
[80] Zhang L, Li C, Huang X L, et al. Compact adaptive interferometer for unknown freeform surfaces with large departure[J]. Optics Express, 2020, 82(2): 1897-1913.
-


 E-mail Alert
 RSS
RSS
 下载:
下载:
