-
摘要:
针对钢板厚度及其表面缺陷的在线检测问题,设计了钢板外观质量检测系统。通过线阵CCD相机采集钢板表面的云纹图像,并对云纹图像进行小波变换,提取小波脊处对应的小波变换系数的相位信息,从而实现对钢板的三维重构。实验结果证明:钢板的厚度测量精度为0.08 mm;表面缺陷的测量精度为0.2 mm;在线检测速度为6 m/s。能够同时实现钢板的厚度与表面缺陷的在线检测。
 Abstract:
In this paper, in view of the on-line inspection of the thickness of steel plate and its surface defects, a quality inspection system for appearance of steel is designed. The moire image on the surface of the steel plate is collected by a linear CCD camera. The fringe image is transformed by wavelet transform, and the phase information of wavelet transform coefficients corresponding to the wavelet ridge is extracted to reconstruct the 3D profile. Experimental results show that the thickness measurement precision of the steel plate is 0.08 mm and the measurement accuracy of the surface defect is 0.2 mm. The online detection speed is 6 m/s. The on-line detection of thickness and surface defect of steel plate can be realized.
-

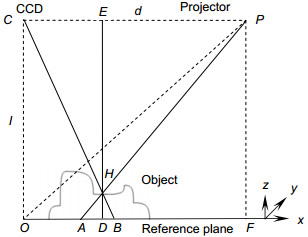
Overview: Steel plate, as an indispensable raw material in daily life, has been widely used in various fields. Therefore, it is of great significance to detect the appearance quality of steel plate for improving the production process of steel plate. At present, the mainstream detection methods include eddy current testing, radiographic testing, machine vision detection and so on. These detection methods mainly detect the surface defects of steel plates, and cannot detect the thickness of steel plates while detecting the surface defects of steel plates. In this paper, the surface defects and the thickness of steel plate can be detected at the same time. The 3D reconstruction technique of the grating projection is applied to the steel plate detection, which can reconstruct the three-dimensional contour of the steel plate, and thus achieve the purpose of detecting the surface defect of the steel plate and the thickness of the steel plate at the same time. This paper focuses on the study of the on-line detection of steel plate. In order to meet the speed of on-line detection, wavelet transform profilometry is selected to calculate the phase of the moire image of the surface of steel plate. Both the wavelet transform profilometry and Fourier transform profilometry are the fastest way to calculate the phase of the moire image. But the Fourier transform profilometry occupies the advantage on the whole information of the image, and the wavelet transform profilometry pays more attention to the extraction of the local information of the image. At the same time, the noise resistance performance of wavelet transform profilometry is more effective than that of Fourier transform profilometry. Therefore, wavelet transform profilometry is more suitable for calculating the phase of moire image on steel plate surface. In the aspect of phase unwrapping, branch cutting is chosen as the method of phase unwrapping. Although the quality map guidance algorithm has a high accuracy of phase unwrapping, it is too slow. The phase by point phase unwrapping method has the fastest phase speed, but it is only suitable to unfold the phase without residual error point. Once the phase diagram has a residual error point, the drawing phenomenon will appear in the process of the phase unwrapping, so the error of the reconstructed steel plate will increase sharply. In terms of speed and accuracy, the branch cutting method is suitable for unwrapping the phase calculated from the moire image of the surface of steel plate. In laboratory environment, the accuracy of steel plate thickness detected by this method can reach 0.08 mm, and the accuracy of surface defect detection can reach 0.2 mm and the detection speed can reach 6 m/s.
-

-
表 1 表面缺陷的最大边界测量结果
Table 1. The measured maximum boundary of surface defects
Defect type Maximum boundary pixel
distanceMethod measurement
results in this paper/mmMeasurement results of vernier
caliper/mmPass defect 1 60 6.0 5.99 Pass defect 2 59 5.9 6.10 Pass defect 3 62 6.2 6.10 Pass defect 4 65 6.5 6.45 Pass defect 5 62 6.2 6.21 Pass defect 6 63 6.3 6.25 Scratch defect 75 7.5 7.26 表 2 两种方法的厚度测量结果
Table 2. The measured thickness of two methods
Plate sample Measurement results of spiral micrometer/mm Method measurement results in this paper/mm max min max min 1 7.05 6.98 7.12 6.96 2 8.02 7.99 8.09 8.00 3 9.04 8.99 9.11 8.09 4 10.04 9.98 10.09 9.99 5 11.03 10.97 11.09 10.98 6 12.01 11.98 12.05 11.95 7 13.05 12.96 13.10 13.01 8 14.02 13.97 14.08 13.99 9 15.03 15.00 15.04 14.95 10 16.02 15.97 16.07 15.98 表 3 两种方法的表面缺陷最大边界距离测量结果
Table 3. The measured maximum boundary distance of two methods for surface defect
Defect type Measurement results of vernier caliper/mm Method measurement results in this paper/mm Scratch defect 50.33 50.2 Oil pollution defect 18.07 17.9 Crack defect 30.90 30.8 Grooves defect 15.53 15.7 Rust defect 46.97 46.8 Air hole defect 11.50 11.7 -
[1] 吴洋.不锈钢应用及其表面处理技术分析[J].中国设备工程, 2017(13): 105–106. doi: 10.3969/j.issn.1671-0711.2017.13.047
Wu Y. Application of stainless steel and analysis of surface treatment technology[J]. China Plant Engineering, 2017(13): 105–106. doi: 10.3969/j.issn.1671-0711.2017.13.047
[2] Zhang H, Zhang Y J, Han J T, et al. Bright line defects of hot rolled plate for 2205 duplex stainless steel[J]. Applied Mechanics and Materials, 2014, 470: 15–18. http://cn.bing.com/academic/profile?id=49044e182ea0cf3b51f995bb98cd998d&encoded=0&v=paper_preview&mkt=zh-cn
[3] Li W B, Zhang Q Z, Sun J L, et al. Review of vision inspection technology for surface defect of steel bar[J]. Applied Mechanics and Materials, 2015, 740: 543–546. doi: 10.4028/www.scientific.net/AMM.740
[4] Soni A K, Sasi B, Thirunavukkarasu S, et al. Development of eddy current probe for detection of deep sub-surface defects[J]. IETE Technical Review, 2015, 33(4): 386–395. http://cn.bing.com/academic/profile?id=633e36f0c14b77b487d79478424e9153&encoded=0&v=paper_preview&mkt=zh-cn
[5] 朱秋峰, 张新燕, 李大安. X射线测厚技术在热轧钢板生产中的应用[J].无损检测, 2008, 30(5): 321–323. http://www.wanfangdata.com.cn/details/detail.do?_type=perio&id=wsjc200805019
Zhu Q F, Zhang X Y, Li D A. Application of X-ray measuring technique in hot strip mill[J]. Nondestructive Testing, 2008, 30(5): 321–323. http://www.wanfangdata.com.cn/details/detail.do?_type=perio&id=wsjc200805019
[6] 宋宇航, 王仲, 付鲁华, 等.钢球表面质量视觉检测仪照明系统优化[J].光电工程, 2016, 43(11): 13–18, 25. doi: 10.3969/j.issn.1003-501X.2016.11.003
Song Y H, Wang Z, Fu L H, et al. Improved illumination for steel ball surface inspection system[J]. Opto-Electronic Engineering, 2016, 43(11): 13–18, 25. doi: 10.3969/j.issn.1003-501X.2016.11.003
[7] 安东, 陈李, 丁一飞, 等.光栅投影相位法系统模型及标定方法[J].中国光学, 2015, 8(2): 248–-254. http://www.wanfangdata.com.cn/details/detail.do?_type=perio&id=zggxyyygxwz201502012
An D, Chen L, Ding Y F, et al. Optical system model and calibration of grating projection phase method[J]. Chinese Optics, 2015, 8(2): 248–254. http://www.wanfangdata.com.cn/details/detail.do?_type=perio&id=zggxyyygxwz201502012
[8] 梁曼, 张子邦, 钟金钢.瞬时频率引导的小波变换轮廓术相位解包裹技术[J].光电子·激光, 2016, 27(8): 853–862. http://www.cnki.com.cn/Article/CJFDTOTAL-PPXZ200704006.htm
Liang M, Zhang Z B, Zhong J G. Phase unwrapping guided by instantaneous frequency for wavelet transform profilometry[J]. Journal of Optoelectronics·laser, 2016, 27(8): 853–862. http://www.cnki.com.cn/Article/CJFDTOTAL-PPXZ200704006.htm
[9] 陶伟, 李文尧, 张登, 等.基于小波变换的TEM信号处理中小波基函数的选择[J].中国锰业, 2016, 34(6): 175–176. http://glearning.tju.edu.cn/pluginfile.php/185664/mod_forum/attachment/56948/%E5%9F%BA%E4%BA%8EHarr%E5%B0%8F%E6%B3%A2%E5%9B%BE%E5%83%8F%E5%88%86%E8%A7%A3%E4%B8%8E%E9%87%8D%E6%9E%84.pdf
Tao W, Li W R, Zhang D, et al. A selection of wavelet basis function in tem signal processing based on wavelet transform[J]. China's Manganese Industry, 2016, 34(6): 175–176. http://glearning.tju.edu.cn/pluginfile.php/185664/mod_forum/attachment/56948/%E5%9F%BA%E4%BA%8EHarr%E5%B0%8F%E6%B3%A2%E5%9B%BE%E5%83%8F%E5%88%86%E8%A7%A3%E4%B8%8E%E9%87%8D%E6%9E%84.pdf
[10] 徐东瀛, 李思坤, 王向朝, 等.基于评价函数的二维小波变换轮廓术小波脊提取方法[J].光学学报, 2016, 36(4): 0412006. http://www.cnki.com.cn/Article/CJFDTotal-GXXB201604022.htm
Xu D Y, Li S K, Wang X Z, et al. Wavelet ridge extraction method employing a cost function in two-dimensional wavelet transform profilometry[J]. Acta Optica Sinica, 2016, 36(4): 0412006. http://www.cnki.com.cn/Article/CJFDTotal-GXXB201604022.htm
[11] 黄昊, 达飞鹏.小波变换轮廓术中快速相位展开方法研究[J].仪器仪表学报, 2012, 33(2): 397–404. http://www.cnki.com.cn/Article/CJFDTOTAL-GDYG201404018.htm
Huang H, Da F P. Novel phase unwrapping method for wavelet profilometry[J]. Chinese Journal of Scientific Instrument, 2012, 33(2): 397–404. http://www.cnki.com.cn/Article/CJFDTOTAL-GDYG201404018.htm
[12] 郑毅, 陈文静, 钟敏, 等.提高基于Morlet小波"脊"处理方法的相位解调精度研究[J].激光与光电子学进展, 2014, 51(11):148–155. http://www.cnki.com.cn/Article/CJFDTotal-JGDJ201411020.htm
Zheng Y, Chen W J, Zhong M, et at. Study of profilometry measurement precision improvement based on morlet wavelet transform[J]. Laser & Optoelectronics Progress, 2014, 51(11):148–155. http://www.cnki.com.cn/Article/CJFDTotal-JGDJ201411020.htm
[13] 张腾达, 卢荣胜, 张书真.基于二维DFT的TFT-LCD平板表面缺陷检测[J].光电工程, 2016, 43(3): 7–15. http://www.cqvip.com/QK/90982X/201603/668342863.html
Zhang T D, Lu R S, Zhang S Z. Surface defect inspection of TFT-LCD panels based on 2D DFT[J]. Opto-Electronic Engineering, 2016, 43(3): 7–15. http://www.cqvip.com/QK/90982X/201603/668342863.html
[14] 安东. 基于数字光栅投影的三维表面测量技术研究[D]. 合肥: 合肥工业大学, 2015.
An D. Research of 3D surface measurement based on digital grating projection[D]. Hefei: Hefei University of Technology, 2015.
[15] Lu Y F, Zhang T, Zheng J, et al. No-reference blurring image quality assessment based on local standard deviation and saliency map[J]. Journal of Jilin University (Engineering and Technology Edition), 2016, 46(4): 1337–1343. https://www.researchgate.net/publication/306322126_No-reference_blurring_image_quality_assessment_based_on_local_standard_deviation_and_saliency_map
-


 E-mail Alert
 RSS
RSS

 下载:
下载:


