A scanning micro phase measuring profilometry based on optical flow pixel matching
The industrial revolution freed humanity from the constraints of manual labor, leading to unprecedented growth in production efficiency and societal wealth. With the increasing automation of industrial production, traditional manual operations have been progressively replaced by intelligent production systems driven by computers and robots, making assembly lines increasingly prevalent. To enhance production efficiency, reduce costs, and ensure product quality, there is an urgent need for implementing online three-dimensional (3D) inspection of products on production lines. As a result, there is a growing interest in high-precision inspection methods suitable for online 3D measurement.
Among the many optical 3D measurement methods, phase-measuring profilometry (PMP) is one of the most precise techniques based on structured light 3D measurement with the advantages such as non-contact operation, full-field measurement, and high flexibility. PMP typically needs the measured object to keep stationary during the measurement process to accurately acquire the modulated fringe patterns with actively designed phase shifts, which can perform phase unwrapping pixel by pixel. However, for the 3D inspection in assembly line scenarios, objects are in motion. It would significantly disrupt production continuity and reduce efficiency by the fixed position detection solution. Alternatively, the single-frame methods such as Fourier transform profilometry (FTP) would compromise measurement accuracy. And, the high-speed solution, which can treat the measuring process as a static scenario within an ultimately short time, might increase the costs dramatically. In fact, the movement of the product will introduce the variations in the projected fringe patterns. As long as a correlation between the product's displacement and the phase shift is figured out, it is possible to decipher the correct phase from the deformation fringe patterns acquired simultaneously along the product's motion. Then it will be promising to implement 3D inspection for the assembly line applications.
The 3D Sensing and Machine Vision team at Sichuan University has dedicated many years to research in the field of structured light 3D measurement technology, achieving a series of significant advancements. Recently, Associate Professor Liu Yuankun from the team proposes a scanning microscopic 3D morphology measurement method that combines optical flow with a probability density function (PDF). This method aims to achieve high-precision pixel matching and phase shift estimation, and enable high-accuracy measurements of small-field objects. The researchers first utilize a microscopic system to achieve a telecentric projection and imaging, which can transform the object movement into the identical pixel displacement for both the imaging and projection units. Next, the white light and fringe images are captured synchronously, and the optical flow method is used to calculate pixel displacement from those white light images, which can further guide the pixel match of the fringe images. Then, the phase probability density is applied to search the correct fringe period via its uniformity and get the precise phase shift amount. Finally, the high-precision 3D shape will be restored after the correct phase information is calculated by the arbitrary N-step phase-shift algorithm.
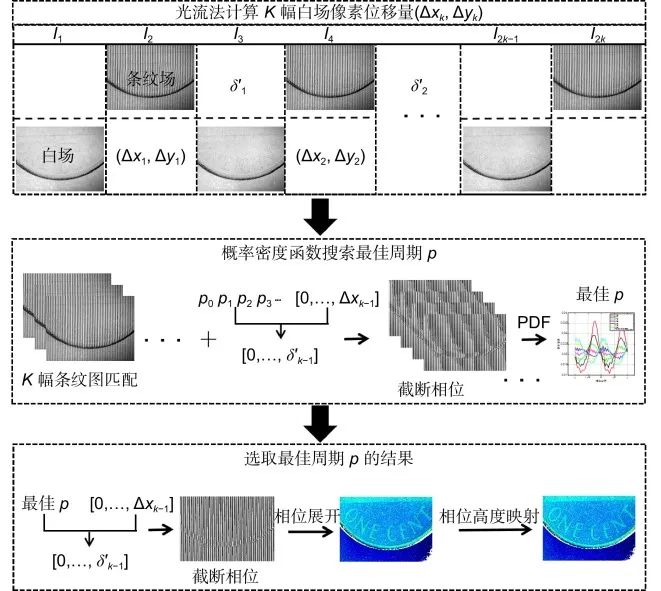
Fig.1 The workflow of the proposed method
Experimental results show that the measurement accuracy of this method is close to that of static measurement, with an RMSE of 0.008 mm in the small field (16mm*12mm) plane accuracy verification experiment, providing a new precise measurement solution for online scanning. This work, titled "A Scanning Micro Phase Measuring Profilometry Based on Optical Flow Pixel Matching," was published in Opto-Electronic Engineering 2024,Vol.11.
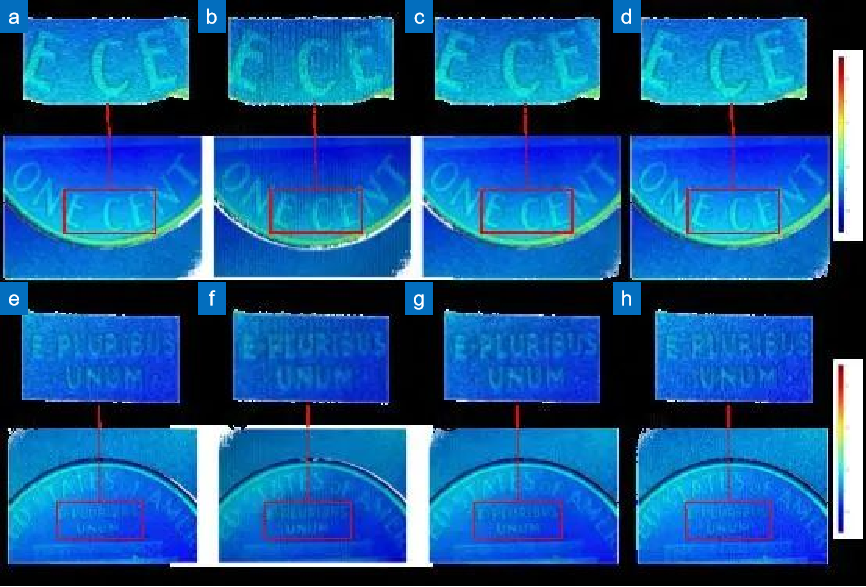
Fig.2 Measurement result of coin. (a)(e):12-steps of classic phase shift (b)(f),(c)(g),(d)(h):Proposed method with 3,6,12-steps scanning phase shift
Funded by the National Key Research and Development Program of China (2022YFF0712902)
About The Group
The Laboratory of Three-dimensional Sensing and Machine Vision of Sichuan University was initiated and established by Prof. Su Xianyu in 1988, and is currently headed by Prof. Zhang Qican, who is the first to carry out and has been engaged in the research of principle and methodology of optical three-dimensional sensing, vision measurement and optoelectronic detection based on structured light illumination, key technology and application of research, and has achieved a number of innovative results with independent intellectual property rights on the technology of complex shape and dynamic three-dimensional measurement. In the complex shape and dynamic three-dimensional measurement technology, the team has made a number of innovative achievements with independent intellectual property rights, has a number of national patents, and has successfully developed a variety of three-dimensional sensing products. In 2003, the team was awarded the first prize of Natural Science by the Ministry of Education, and in 2004, the second prize of National Technological Invention. In recent years, in order to better serve the needs of the country and social and economic development, their research direction has been concentrated on precision optical measurement and computational optical imaging. The laboratory has devoted itself to high-precision three-dimensional sensing, ultra-high-speed three-dimensional measurement, multi-dimensional computational sensing and photomechanical analysis, new imaging technology, all-link computational imaging, artificial intelligence theory and multimodal medical diagnosis, and constructed systematic cutting-edge researches in the field of computational imaging, and achieved a number of innovative research results in the theoretical exploration and engineering practice in this field.
Article
Wang S Y, Liu Y K, Yu X. A scanning micro phase measuring profilometry based on optical flow pixel matching[J]. Opto-Electronic Eng, 2024, 51(11): 240194
Related Article
邵金凤,倪育博,孟召宗,等. 基于离焦二值显示和条纹投影的复合表面三维测量方法[J]. 光电工程,2024,51(4): 240024.
向卓龙,张启灿,吴周杰. 结构光投影三维面形测量及纹理贴图方法[J]. 光电工程,2022,49(12): 220169.

 08 January 2025
 13
13


